- PolyJet Legacy Printers
- Alaris30 V1
- Connex260
- Connex350/500
- Eden250
- Eden260
- Eden260V/VS
- Eden330
- Eden350
- Eden350V/500V
- J700 & J720 Dental
- J750/J735
- J750 Digital Anatomy
- Objet24/30 V2 Family
- Objet24/30 V3 Family
- Objet30 V5 Pro & Prime
- Objet260 Connex 1-2-3
- Objet260 Dental & Dental Selection
- Objet350/500 Connex 1-2-3
- Objet1000 Plus
- PolyJet Materials
- Agilus30 family
- Biocompatible
- Biocompatible Clear MED610
- Dental Materials
- Dental TrueDent Materials
- Dental TrueDent-D Materials
- Digital ABS Plus
- DraftGrey
- Elastico Clear/Black
- High Temperature
- MED610-DSG
- PolyJet Support
- Rigur & Durus
- Tango
- PolyJet ToughONE™
- Transparent
- Vero ContactClear
- Vero Family
- Veroflex
- VeroUltra Opaque
- Vivid Colors
- Stereolithography Materials
- Somos® 9120™
- Somos® BioClear™
- Somos® DMX SL™ 100
- Somos® Element™
- Somos® EvoLVe™ 128
- Somos® GP Plus™ 14122
- Somos® Momentum™
- Somos® NeXt™
- Somos® PerFORM™
- Somos® PerFORM Reflect™
- Somos® ProtoGen™ 18420
- Somos® ProtoTherm™ 12120
- Somos® Taurus™
- Somos® WaterClear® Ultra 10122
- Somos® WaterShed® AF
- Somos® WaterShed® Black
- Somos® WaterShed® XC 11122
- Somos® WaterShed® XC+
Getting Started with GrabCAD Control
This guide introduces the different parts of the GrabCAD Control for Stratasys customer admins and their users, Stratasys printers and licenses.
Introduction
Company - Your GrabCAD company represents the highest level of your organization. A company may claim ownership of an email domain, so it needs to represent all offices and divisions of your company.
Company admin - Responsible for inviting users, creating groups, and controlling access to the machines, software licenses and other parts of the GrabCAD software platform. Only admins have access to GrabCAD Control.
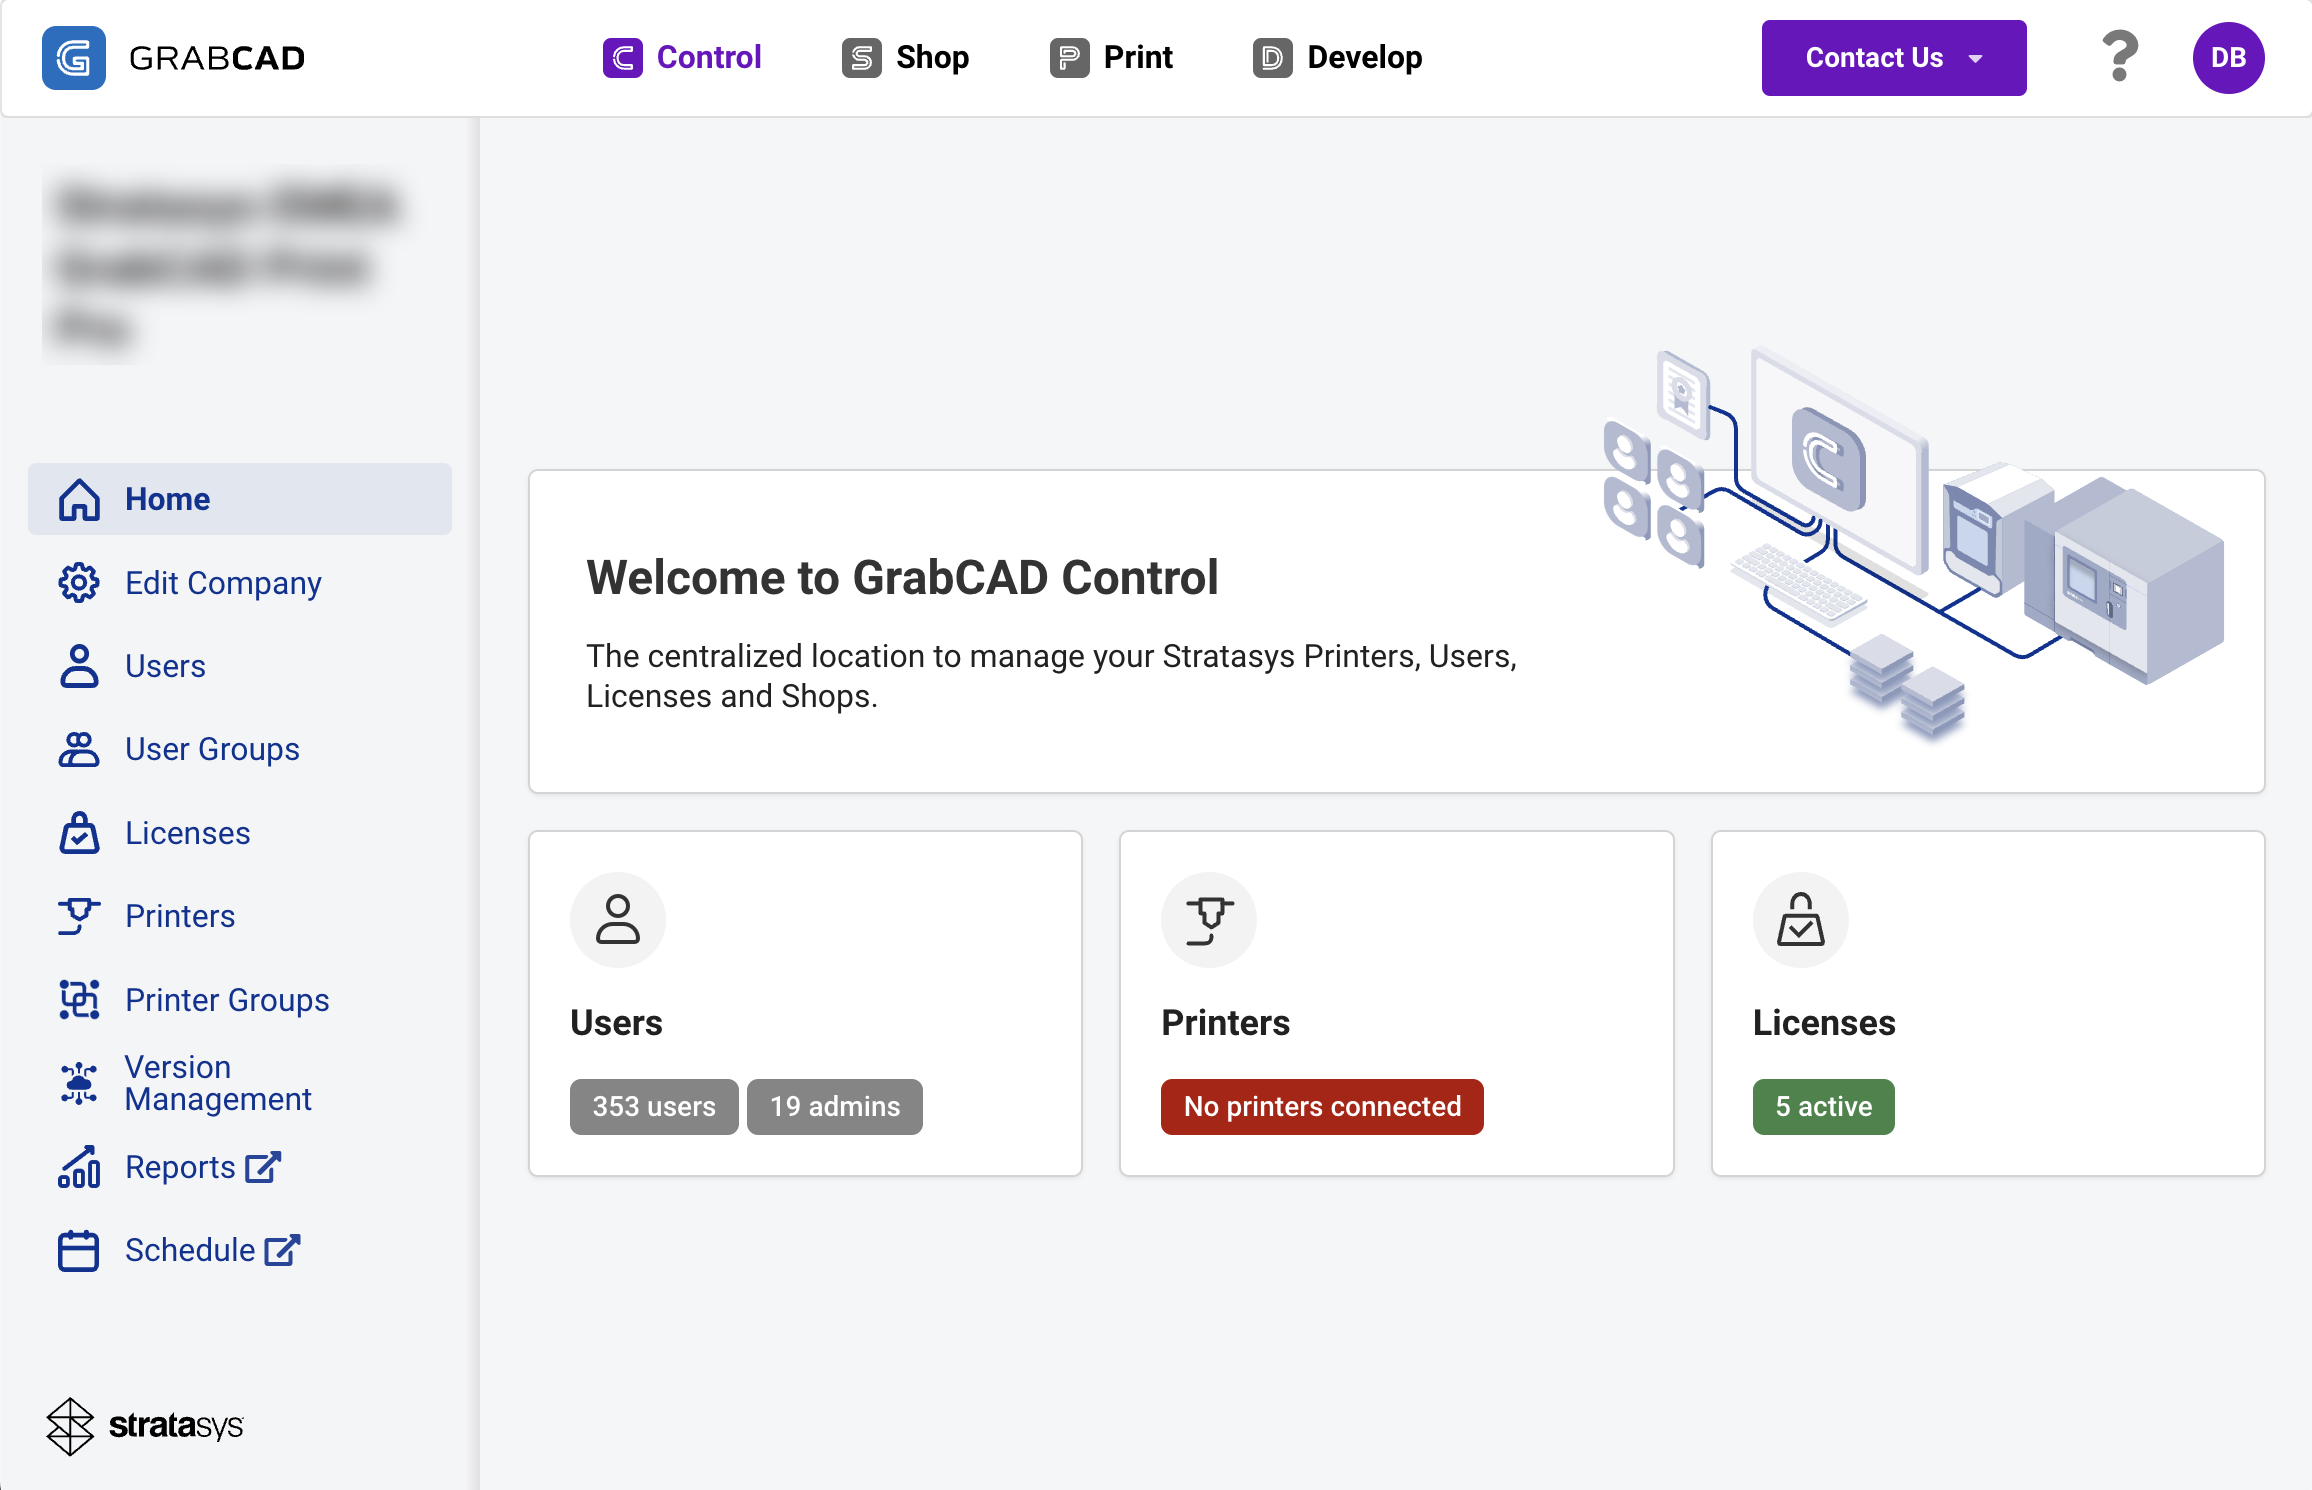
GrabCAD Control - A free web app accessible only to company admins for administering users, groups, printers, and licenses. The address for GrabCAD Control is company.grabcad.com
User group - A collection of users in the company set up by a company admin. Access to printers and software is given at the group level. Licenses, permissions, and specific roles within software are also part of setting up the group.
License - Access to a product or feature purchased through a Stratasys sales representative, delivered to your company account. Licenses are managed entirely by GrabCAD Control; there are no keys or license files.
Accessing Your Company
Start by going to company.grabcad.com. (For a list of supported browsers, click here.) You will see a login screen. This is a separate web application from grabcad.com, although it uses the same credentials. If you are new to GrabCAD products, click Create Account, otherwise log in with your existing credentials.
If you belong to a company account and you are an admin, you are directed to your company’s GrabCAD Control home page, or you may see a selection screen if your company has an active Streamline Pro license. Click on Control if you see the selection screen.
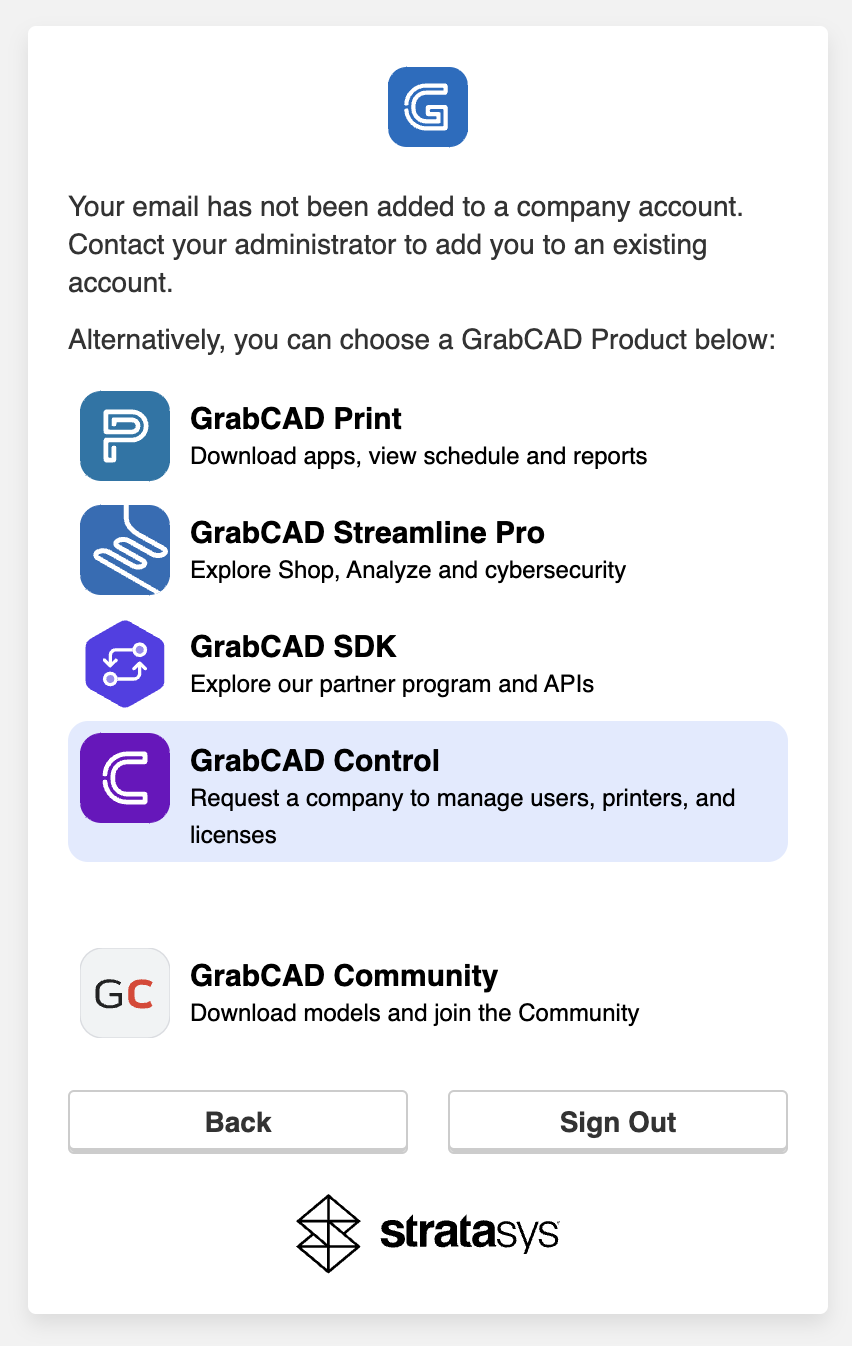
If you are not an admin, you cannot access GrabCAD Control, so a window gives you some options for other pages to go to. If you do not belong to a company at all, you see a similar screen, but one of the options allows you to request a company account.
Creating User Groups and Adding Users
Add Other Admins
Click Edit Company in the left navigation bar to change the list of company admins. Whoever you add here will be able to access GrabCAD Control to manage users, groups, and licenses. If your company has multiple sites or divisions, be sure to add an admin for each team. The Edit Company page is also where you may rename your company, or set up Operating Hours for Schedule View.
Add Users
Go to Users in the left navigation bar. Here you can view all the users who have been added to your company or add new users as shown below. You can enter multiple emails here and assign them to a group at the same time.
Invited users are automatically added to the account, they do not need to accept an invitation. However, if they don’t yet have a GrabCAD login, they will need to create one. If the group you added them to has a Shop role assigned, then they will receive an email with signup instructions. If the group has only Print-related licenses assigned, then no email is sent. This will be fixed soon, but for now, invited users need to go to https://login.grabcad.com/create_account if they do not already have credentials.
You can also add your organization’s email domain (email@domain.com), so users in your company can join at any time. Someone from Stratasys will review your domain request as soon as possible. If your domain is approved, users who log in or sign up at https://login.grabcad.com/ will join your company account.

Create Groups
If you have any per-user licenses, such as GrabCAD Print Pro, a User Group is required in order to distribute the license to a specific user or users. In most cases, the GrabCAD support will create such user groups on your behalf as part of delivering the license. If you have a Streamline Pro license and you've set up Shop, you will see that user groups have been automatically created for Shop's two roles: Operators and Requesters. Read more here.
To create a new User Group, click User Groups in the left navigation bar, then click New User Group. Name your user group then assign the product or role appropriate for the group, then click on emails from the left column to add them to the group. Be sure to hit Submit to finish creating the group. 
Important Note:
A user group may have any number of users in it. When you are using the group to distribute a per-user license, it is possible to add more users than there are seats available to assign. If this occurs, the selection of user(s) who receive a seat of the license will be set randomly, since per-user license seats cannot float from user to user. Therefore, please make sure the number of users in the group matches the number license seats. For instance, if you have a license for one seat of GrabCAD Print Pro, make sure that the corresponding user group has only one member.
Managing Your Company’s Licenses
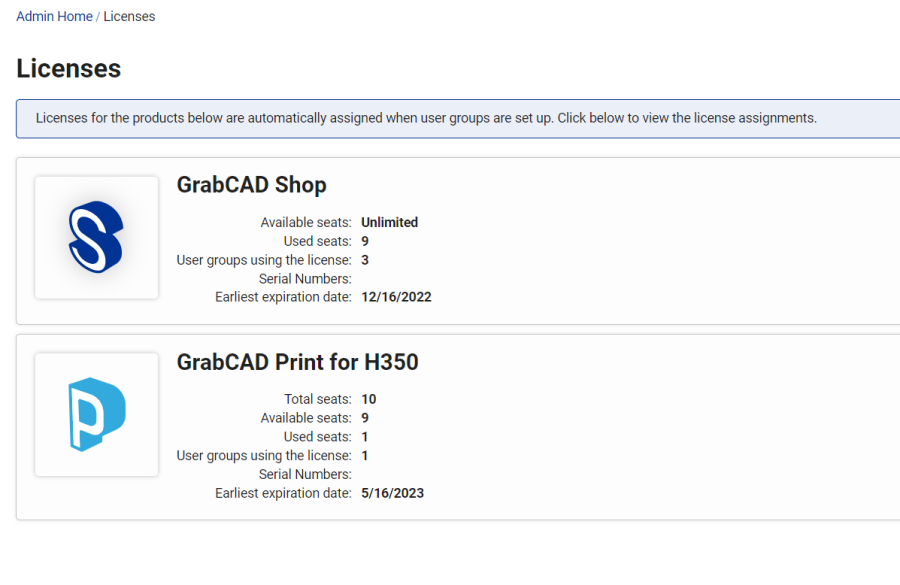
To view all your paid software products, click Licenses in the left navigation bar. Here you can view your GrabCAD Shop, GrabCAD Print software licenses, partner licenses (if you are Stratasys software partner) and more, along with their expiration dates and usage.
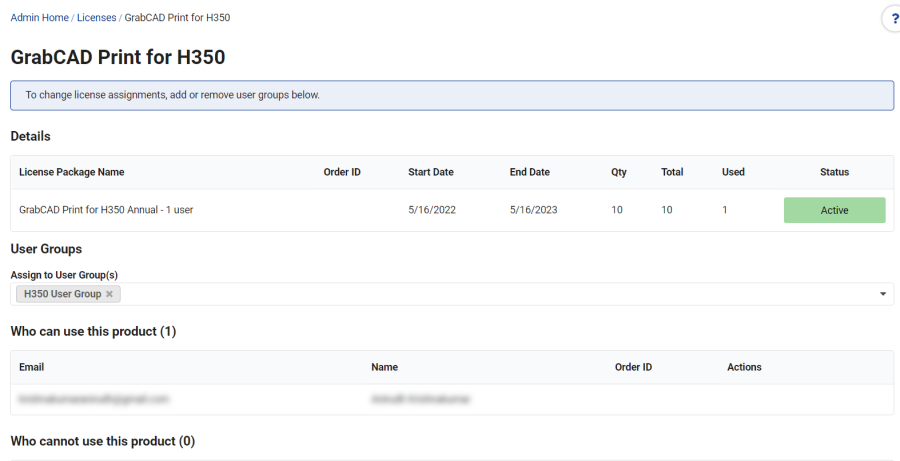
To grant / revoke access to these licenses, click any license. Here you can assign / remove your user groups. The users in those groups will automatically be given access to the license.
Note: If your company uses GrabCAD Shop, you need to grant access to specific shop(s) and give your users a role in those shops. This is explained in this article and needs to be done in the User Groups page. Once you assign shops and roles, you can come back to the GrabCAD Shop license page to review your assignments and usage.
Connecting Your Stratasys Printers
To view your Stratasys printers in the "Printers" page of GrabCAD Control, you must download and install the GrabCAD Print server. The benefits and installation instructions of GrabCAD Print server are explained in this article. You'll need a computer that is connected to the network at all times, and in the same network as your Stratasys printers. Check out the system requirements for GrabCAD Print Server.
Once the GrabCAD Print server is installed, login with your GrabCAD credentials and select the company that you are part of (It should be same as your GrabCAD Control Company). Once you select your company in the GrabCAD Print server, you will see a message: "X printers connected".
You can return to GrabCAD Control and go to the Printers page. You will see all your printers here as shown below. Your GrabCAD Print server, printers and GrabCAD Control are now connected.
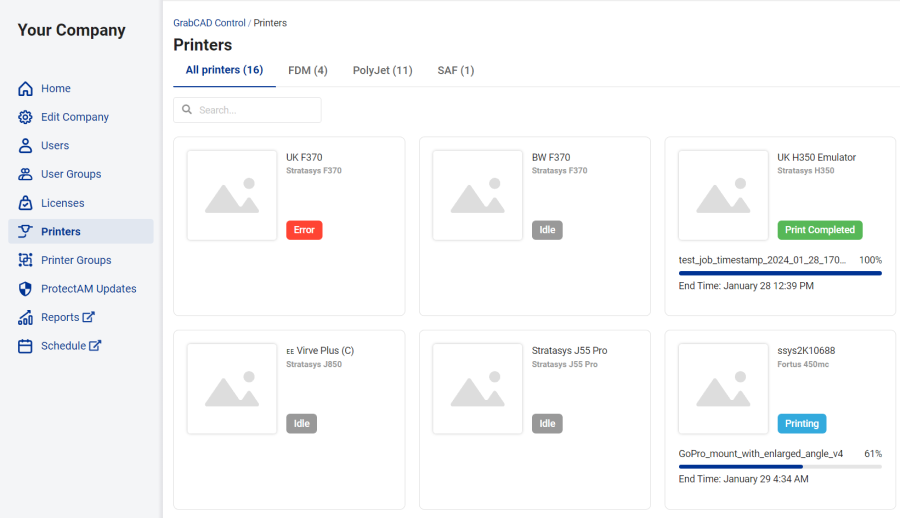
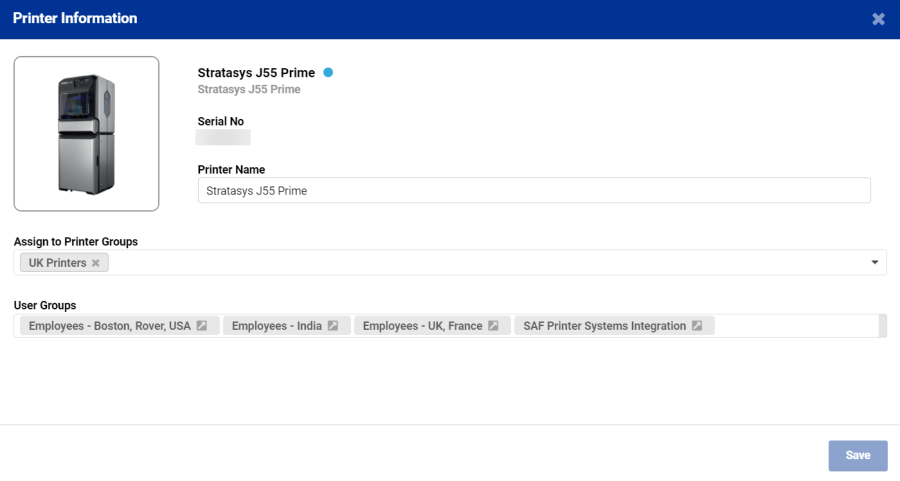
Once your printers are connected and visible in GrabCAD Control, you can view the serial numbers and change printer names by clicking on any printer card. Once you change the printer's name, you will see the new name in all your GrabCAD Apps (GrabCAD Print, Schedule, Reports, Mobile, etc).
If you have many printers, and would like to group them for convenience, or by site/location or department, go to "Printer Groups". Click "New Printer Group", name your group and select the printers you want in the group.
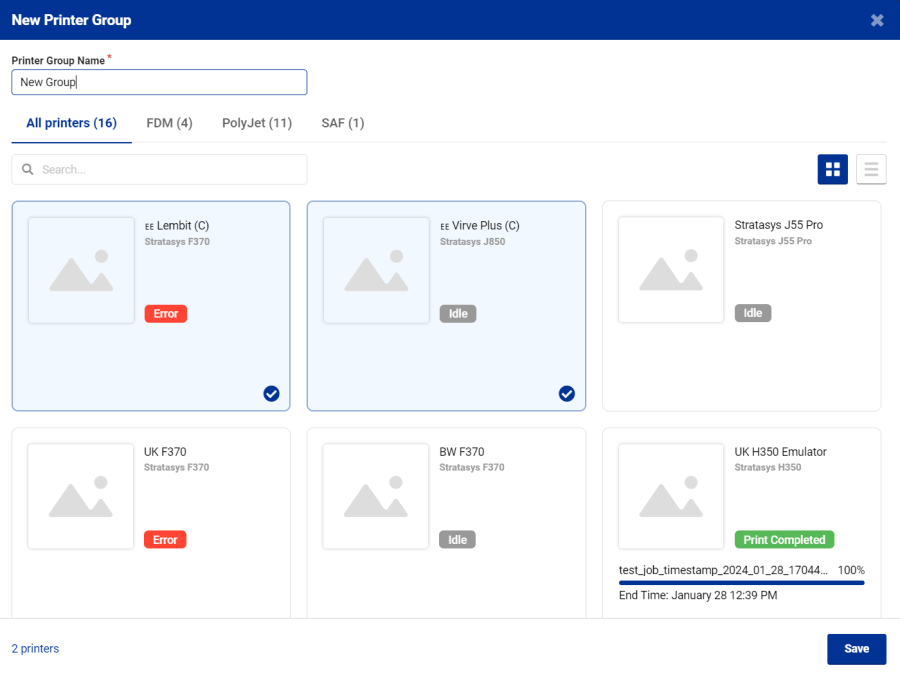
The same printer can be part of multiple groups.